How to install Ioncube Loader PHP on Linux Ubuntu

Ioncube Loader Extenion allows to run encoded PHP scripts by Ioncube Encoder.

  • Ioncube Loader Extension – extension which starts witch PHP process that can read and run encoded files. The extension is free.
  • Ioncube Encoder – software that allows encode and obfulscate PHP scripts using license key to description.

This tutorial shows how to install Ioncube Loader Extension.

1. Download Ioncube loader extension.

Go to the http://www.ioncube.com/loaders.php url and locate your proper platofrm version.

If you are not sure what platform (x86 or 64-bit, TS or NTS ) you need, just run phpinfo() and read from „System” and „PHP Extension Build”. For example this entry looks like:

System: Linux athlan-VirtualBox 3.13.0-24-generic #46-Ubuntu SMP Thu Apr 10 19:11:08 UTC 2014 x86_64

PHP Extension Build: API20121212,NTS

I am using 64-bit platform, NTS (non-thread safe).

So copy proper link and call:

wget http://downloads3.ioncube.com/loader_downloads/ioncube_loaders_lin_x86-64.tar.gz

Extract the package

tar xvfz ioncube_loaders_lin_x86-64.tar.gz

athlan@athlan-VirtualBox:~/tmp/ioncube$ ls -1
ioncube_loader_lin_4.1.so
ioncube_loader_lin_4.2.so
ioncube_loader_lin_4.3.so
ioncube_loader_lin_4.3_ts.so
ioncube_loader_lin_4.4.so
ioncube_loader_lin_4.4_ts.so
ioncube_loader_lin_5.0.so
ioncube_loader_lin_5.0_ts.so
ioncube_loader_lin_5.1.so
ioncube_loader_lin_5.1_ts.so
ioncube_loader_lin_5.2.so
ioncube_loader_lin_5.2_ts.so
ioncube_loader_lin_5.3.so
ioncube_loader_lin_5.3_ts.so
ioncube_loader_lin_5.4.so
ioncube_loader_lin_5.4_ts.so
ioncube_loader_lin_5.5.so
ioncube_loader_lin_5.5_ts.so
ioncube_loader_lin_5.6.so
ioncube_loader_lin_5.6_ts.so
LICENSE.txt
loader-wizard.php
README.txt
USER-GUIDE.txt

2. Copy extension to PHP extension dir

Locate your extenion dir:

athlan@athlan-VirtualBox:~/tmp/ioncube$ php -i | grep extension_dir
extension_dir => /usr/lib/php5/20121212 => /usr/lib/php5/20121212

Copy here your proper loader, in my case:

cp ./ioncube_loader_lin_5.5.so /usr/lib/php5/20121212

3. Add extension to php.ini file

You must add Ioncube Loader to php.ini file pointing proper file:

zend_extension=ioncube_loader_lin_5.5.so

Make sure that extension is the first loaded extension for PHP, because the error will appear:

PHP Fatal error: Unable to start ionCube Loader module in Unknown on line 0

In my Ubuntu the extensions directory are under: /etc/php5/mods-available directory – one per extension. So define ioncube.ini file. In php+apache2 for ubuntu there are configuratios groupped by environment, one is apache2, so I make symbolic link to include my .ini file:

ln -s .etc/php5/mods-available/ioncube.ini /etc/php5/apache2/conf.d/01-ioncube.ini

I named my file by prefix 01- to make sure that it will be the first included extension.

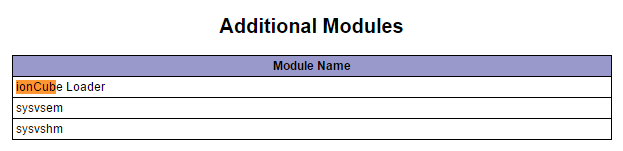
4. Check configuration

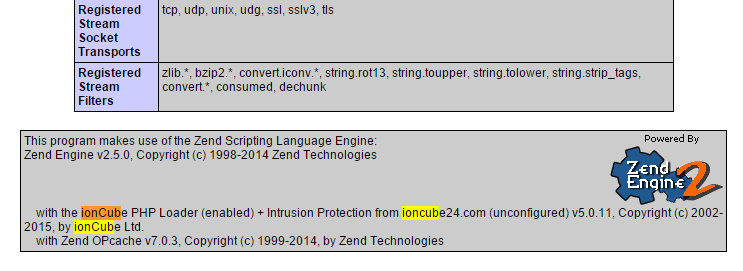
Make file with phpinfo() and check if Ioncube is loaded under „Additional Modules” and „with the ionCube PHP Loader (enabled) + Intrusion Protection from ioncube24.com (unconfigured) v5.0.11, Copyright (c) 2002-2015, by ionCube Ltd.”:

ioncube-phpinfo

ioncube-phpinfo2

Done!

Known issues:

Apache hangs while start

The apache2 instance did not start within 20 seconds. Please read the log files to discover problems

Probably you have not proper version of your extension included (TS or NTS). Please verify that comparing to your phpinfo() „System” and „PHP Extension Build”.

Invalid extension definition

[Sat Jul 11 15:44:24 2015] [warn-phpd] The ionCube Loader is a Zend-Engine extension and not a module (pid 3038)
[Sat Jul 11 15:44:24 2015] [warn-phpd] Please specify the Loader using 'zend_extension’ in php.ini (pid 3038)

You have included Ioncube by extension= while zend_extension= should be used.

Ioncube Loader is loaded after another extensions

PHP Fatal error: [ionCube Loader]
The Loader must appear as the first entry in the php.ini file in Unknown on line 0

You have to specify zend_extension directive in php.ini as a first extension loaded. To make sure, just place it as a first line.


Symfony2 Redis Session Handler

Context

When you scale a PHP

application you have to consider several aspects of runtime environment such us:

  • Bytecode caching (e.x. APC or Zend Optimizer Plus or eAccelerator), more;
  • Reading project files from RAM instead of HDD;
  • Caching and minify static content etc.
  • One additional aspect is storing sessions.

By default, PHP stores sessions in files. There are also several approaches to speed up saving sessions, such us memcached, mapping save_path folder as ramdisc, etc.

In scaling approaches there is important that many worker nodes (with deployed application) runs the same code, round-robin selected or load-ballanced, but have the same space to store sessions, because there is no guarantee in distributes architecture, that next user’s request will be handled by the same node. This implies, that session memory have to be shared between nodes, unfortunately storing these data in local

RAM doesn’t meet this requirement.

Redis as PHP Session Handler

One of additional approach to storing sessions in fast-memory is Redis – key-value store. This could be configured as centralized or distributed database.

There is available a Redis session_handler for PHP. To use it:

  1. install Redis first as a service [more]
  2. copy/compile redis.so PHP extension [more information]
  3. register an extension in php.ini configuration file
  4. reconfigure session.save_handler in your php.ini configuration file, or set it directly on runtime by writing for e.x.:
ini_set('session.save_handler', 'redis');
ini_set('session.save_path', 'tcp://localhost:6379');
Redis Session Handler in Symfony 2

I am using Symfony 2 framework. Unfortunately, 4th step don’t affects the application. You have to register own SessionHandler in config.yml file:

framework:
 session:
 handler_id: session_handler_redis

This configuration uses new SessionHandler registered ad session_handler_redis Symfony Service (more).

We have to write own SessionHandler in Symfony. I have found the Redis SessionHandler proposed by Andrej Hudec on GitHub (original code here). I have decided to use and improve existing implementation.

Declare new SessionHandler class somewhere in your project:

<?php

namespace Fokus\Webapp\CommonBundle\SessionHandler;

use \Symfony\Component\HttpFoundation\Session\Storage\Handler\NativeSessionHandler;

/**
 * NativeRedisSessionStorage.
 *
 * Driver for the redis session 
save hadlers provided by the redis PHP extension. * * @see https://github.com/nicolasff/phpredis * * @author Andrej Hudec <pulzarraider@gmail.com> * @author Piotr Pelczar <me@athlan.pl> */ class NativeRedisSessionHandler extends NativeSessionHandler { /** * Constructor. * * @param string $savePath Path of redis server. */ public function __construct($savePath = "") { if (!extension_loaded('redis')) { throw new \RuntimeException('PHP does not have "redis" session module registered'); } if ("" === $savePath) { $savePath = ini_get('session.save_path'); } if ("" === $savePath) { $savePath = "tcp://localhost:6379"; // guess path } ini_set('session.save_handler', 'redis'); ini_set('session.save_path', $savePath); } }

Now, add the entry that declares

the class as a Symfony Service in services.yml file:

services:
 session_handler_redis:
 class: Fokus\Webapp\CommonBundle\SessionHandler\NativeRedisSessionHandler
 arguments: ["%session_handler_redis_save_path%"]

I have improved Andrzej’s code that you can configure the session handler calling it’s constructor and pass the Redis connection string just in services in Symfony, without touching ini_set or php.ini settings. As you see, the %session_handler_redis_save_path% parameter has been used.

Now, declare the value of parameter in parameters.yml file:

session_handler_redis_save_path: tcp://localhost:6379

That’s all!

Just refresh your page, use the session such us in after loging and check out if it works. Type in command line:

redis-cli

and show all keys stored by PHP Session Handler. Keys begins with string PHPREDIS_SESSION:.

KEYS PHPREDIS_SESSION*

Example output:

redis 127.0.0.1:6379> KEYS PHPREDIS_SESSION*
1) "PHPREDIS_SESSION:s4uvor0u5dcsq5ncgulqiuef14"
2) "PHPREDIS_SESSION:dcu54je80e6feo5rjqvqpv60h7"

Hope it helped!


VirtualBox Linux server on Windows

Howdy! Recently I have faced the inconvenience that I have to develop parts of application beeing friendly-configurable on Linux and at the same time installing them on Windows is a nightmare.

What to do when do you develop on Windows, but you need the production environment based on Linux and you don’t want to buy server? Install Linux locally on Windows and run server on VirtualBox installed on Windows. The same story concerns the situation, when the production server have a lot of shit dependencies you don’t want to have on your developing environment, even it is Linux.

So how to connect VirtualBox Linux server from Windows?

  1. Download the VirtualBox and Linux distribution you want to install (.iso format will be convinience). I

    have coised Ubuntu, because of  rapid installation.

  2. Create a new virtual machine for your Linux. More info.
  3. Mount your .iso and install Linux on VirtualBox. Installation is really user-friendly.
  4. Now go to the setting of your virtual machine -> network adapters settings -> and change your network adapter to NAT. More info.
  5. Check if everything is ok, in particular that network adaper on virtual machine obtained the IP address. Just type:
    /sbin/ifconfig

    or:

    /sbin/ifconfig | grep addr

    Note the assigned IP address.

  6. Try to ping your virtual machine from host operating system, where VirtualBox is running:
    ping virtaul_machine_ip_address
  7. If everything is ok, your machines works mutualy. Now, install Open SSH server on your linux. For ubuntu:
    sudo apt-get install openssh-server
  8. Now, you can open the connection on your host device. On windows, you can use Putty for connect to the virtual machine’s command line.

My Ubuntu’s command line from Windows 8. Localy.

linux-windows8

Happy coddin’!


How to set ID Doctrine2 manually

I faced the

problem with preserving manually setted ID’s of records represented by entities having id

with auto generate strategy.

If for some reasons you really want to set the ID manually either

rely on generating strategy (@GeneratedValue strategy), you have to set:
@GeneratedValue(strategy="NONE")

But if your application rely on auto identifiers creation (@GeneratedValue(strategy="AUTO")) and you have to exceptionally set the ID manually (e.x. for synchronization), you have to change the strategy dynamicaly by injecting it into meta object of entity:

$metadata = $this->entityManager->getClassMetaData(get_class($entity));
$metadata->setIdGenerator(new \Doctrine\ORM\Id\AssignedGenerator());

Where $entity is enetity you want to persist and there is an working entity manager under $this->entityManager.


How to disable trash wordpress feature plugin

Howdy! Recently, I have been working a lot with WordPress engine, modyfying behind the site by writing plugins. I wonder to share my knowledge I collected under The Wordrpess Optimalizations tag, where a lot of simple tricks will be published. I also know that in the web there are a few of advises related with turning WordPress optimized and combination with your’s flair, the WordPress can become a powerfull, huge toll able to build simply sites as well as advanced solutions. The main advantage of WordPress is well developed backend, so you don’t have to care about beautiful and simply way to publish content and concentrate in frontent, striving to make a website much friendly to end user.

Unfortunately, the WordPress has many features that in common are not required in your project. Obviously, it generates relatively huge overhead to server, database and so one.

This post describes how to disable the „Trash” feature, which has been introduced in version 2.9 aimed to keep posts until permament deletion, such as deleting files in operating system. Deleted items are not deleted permanently from the database in fact, instead they appears in „Trash” by marking them as deleted, setting the flag.

Disabling trash manually

To disable trash in wordpress, you can simply define the constant EMPTY_TRASH_DAYS, for example in your wp-config.php.

define('EMPTY_TRASH_DAYS', 0);

From now, all options „Move to trash” will no longer apperar in admin pages, the functionality is just disabled. Just… but copies of posts marked as deleted are still in the database. To truncate them, just execute the sql statement:

DELETE p, p_rel, p_meta
 FROM wp_posts p
 LEFT JOIN wp_term_relationships p_rel ON (p.ID = p_rel.object_id)
 LEFT JOIN wp_postmeta p_meta ON (p.ID = p_meta.post_id)
 WHERE p.post_status = 'trash'

All posts marked as „Move to trash” will be deleted, and theirs post meta (custom fields) and taxonomy relations will be truncated too. The database now is clean.

Writing simple plugin.

We will write a simple plugin. In the /wp-content/plugins/MyPlugin/ create a file plugin.php, and the code within:

define('EMPTY_TRASH_DAYS', 0);

register_activation_hook(__FILE__, function() {
 global $wpdb;

$query = "DELETE p, p_rel, p_meta
 FROM " . $wpdb->posts . " p
 LEFT JOIN " . $wpdb->term_relationships . " p_rel ON (p.ID = p_rel.object_id)
 LEFT JOIN " . $wpdb->postmeta . " p_meta ON (p.ID = p_meta.post_id)
 WHERE p.post_status = 'trash'";

$wpdb->query($query);
});

The Trash feature is disabled by setting the EMPTY_TRASH_DAYS constant, and posts moved to trash will be deleted while plugin activation. We used register_activation_hook function with anonymous function javascript-like callback function (PHP 5.3).

Download the plugin

The plugin compiled to be ready to install is available here:

Hope the post will be helpfull.


Optymalizacja zapytań MySQL dla koniunkcji wielu danych

Nie raz, nie dwa mieliśmy sytuację, która wymagała od nas koniunkcji warunków większej ilości danych lub dane te były tekstowe, ale niedługie. Niby nic, klucze załatwiają sprawę, ale sięgając do kodu gry bukmacherskiej, musiałem ją nieco zoptymalizować pod względem częstego wyciągania danych. Baza rozrosła się dość szybko, dlatego niezbędna była lekka modyfikacja jej struktury.

Moim zadaniem było bardzo częste wyciągnięcie ID meczu, który musiał na raz (AND) być zgodny z żądaną datą, nazwą drużyny pierwszej oraz drugiej. Informacji do warunków dostarczał system. Oprócz daty, są to dane tekstowe, więc połączyłem je ze sobą CONCAT i stworzyłem z nich sumę md5. Indeks, po którym baza szukała, był już krótszy od warunków, bo zawierał zawsze 32 znaki. Pierwszym warunkiem koniunkcji zawsze była suma md5 wymienionych wcześniej pól rekordu, nazwałem to suma kontrolna rekordu, potem faktyczna wartość pól, aby w razie zdublowania sumy kontrolnej (czego się nie spodziewamy, bo zakres wariacji jest ogromny, ale dla idei) wybrać prawidłowy rekord. Do tej pory wystarczało…

Gdy baza rozrasta się, problemem staje się wyszukiwanie. O ile suma kontrolna to już krok w stronę optymalizacji, dla >100k rekordów, baza danych potrzebowała co najmniej 0.05 sekundy na zwrócenie wyniku. Postanowiłem dodać odcisk palca sumy kontrolnej. Najlepszym rozwiązaniem okazało się dodanie jednego bajtu, który zrobił magię w bazie danych. Jedno pole TINYINT – 8 bitów, zakres 0-255 bez znaku. Założenia odcisku palca:

  • jest wartością liczbową oraz zajmuje tylko jeden bajt, aby oszczędzić miejsca w rekordach oraz indeksach bazy danych,
  • nie musi być uniwersalny (unikalny), a jedynie grupować odciski palców w mniejsze, a liczniejsze zbiory.

Rozwiązanie, które zastosowałem przy generowanu odcisku palca sumy kontrolnej, również nie jest skomplikowane:

  1. Odcisk palca to suma kolejnych znaków sumy kontrolnej rekordu, gdzie 0 – 9 zachowują swoje wartości, a litery [a-f] przyjmują kolejno [10-15], dokładnie jak w przeliczaniu pojedynczych wyrazów systemu liczbowego o podstawie 16 (HEX) na dziesiętny.
  2. Skoro jest to suma, to wartość minimalna jest dla samych zer, zatem MIN = 0.
  3. Wartość maksymalną można stworzyć podając same maksymalne wartości F, zatem MAX = 480.
  4. 480 mieści się na 9 bitach (min. 2 bajty, zakres 0-65535 bez znaku, tracimy 65055 wartości), dzieląc liczbę przez 2 tracimy unikalność odcisku dwukrotnie, ale zmieścimy się na ośmiu bitach, czyli jednym bajcie – możemy użyć typu TINYINT (zakres 0-255 bez znaku, nasza to 0-240), zatem tracimy tylko 15 niewykorzystanych wartości.

Przeprowadzamy testy naszego rozwiązania.

Stwórzmy przykładową tabelę danych test_md5_index, która będzie przechowywała wartości tekstowe w polach data_content, data_content2, data_content3. Tabela może zawierać pole dodatkowe, ale te trzy będziemy wykorzystywać w naszym wyszukiwaniu. Ważnym jest to, że warunkiem jest koniunkcja (AND), dlatego możemy stworzyć sumę (analogicznie do sumy logicznej) md5 jako odcisk palca tych pól, który zapiszemy w data_sum varchar(32). Dodatkowo stworzymy odcisk palca odcisku palca – jednobajtowe pole data_sum_index TINYINT.

Od razu zakładamy klucz podstawowy na data_id oraz klucz dla zapytania, który będzie go wykorzystywał, czyli szukanie wspólnie po data_sum_index oraz data_sum.

CREATE TABLE test_md5_index (
  data_id int(11) unsigned NOT NULL AUTO_INCREMENT,
  data_sum_index tinyint(1) unsigned NOT NULL,
  data_sum varchar(32) NOT NULL,
  data_contents text NOT NULL,
  data_contents2 text NOT NULL,
  data_contents3 text NOT NULL,
  PRIMARY KEY (data_id),
  KEY data_index (data_sum_index, data_sum)
) ENGINE=MyISAM DEFAULT CHARSET=utf8 AUTO_INCREMENT=1;

Pora stworzyć funkcję, która przeliczy nam nowy, krótszy odcisk palca na podstawie poprzedniego:

CREATE FUNCTION TestIndexChecksum(sSum VARCHAR(32)) RETURNS TINYINT
BEGIN

  DECLARE sSumPart VARCHAR(1);
  DECLARE iSumPart TINYINT;
  DECLARE iSum SMALLINT DEFAULT 0;
  DECLARE i INT;

  IF (SELECT sSum NOT REGEXP '^([a-z0-9]){32}$') THEN RETURN 0; END IF;

  SET i = 1;

  WHILE i <= LENGTH(sSum) DO
    SET sSumPart = SUBSTR(sSum, i, 1);
    SET iSumPart = (SELECT (CASE WHEN sSumPart = 'a' THEN 10 WHEN sSumPart = 'b' THEN 11 WHEN sSumPart = 'c' THEN 12 WHEN sSumPart = 'd' THEN 13 WHEN sSumPart = 'e' THEN 14 WHEN sSumPart = 'f' THEN 15 ELSE 0 END));

    IF iSumPart = 0 THEN
      SET iSumPart = sSumPart;
    END IF;

    SET iSum = iSum + iSumPart;
    SET i = i + 1;
  END WHILE;

  RETURN iSum / 2;
END;

Aby przeprowadzać testy, stwórzmy sobie procedurę, która wstawi nam N losowo, jakkolwiek wypełnionych rekordów do bazy danych:

CREATE PROCEDURE TestIndexesPrepareTest(IN i INT)
BEGIN
  TRUNCATE TABLE test_md5_index;

  WHILE i > 0 DO

    INSERT INTO test_md5_index SET
      data_contents  = (SELECT REPLACE(CONCAT(RAND() * 32), ".", "")),
      data_contents2 = (SELECT REPLACE(CONCAT(RAND() * 32), ".", "")),
      data_contents3 = (SELECT REPLACE(CONCAT(RAND() * 32), ".", "")),
      data_sum = CONCAT(data_contents, data_contents2, data_contents3),
      data_sum_index = TestIndexChecksum(data_sum);

    SET i = i - 1;
  END WHILE;
END;

Po wykonaniu CALL TestIndexesPrepareTest(100000) mamy przygotowane małe środowisko testowe.

Przygotujmy kilka zapytań do bazy danych, wybieramy losowy rekord, na którym będziemy testowali wyniki. Wykonujemy zapytanie z ręcznie wpisaną wartością warunku wybranego rekordu, sprawdźmy, jak szybko zostanie odnaleziony:

SELECT * FROM test_md5_index WHERE data_sum = "24045771412594250684228176888212";

Average: ~0.0506 sec

SELECT * FROM test_md5_index WHERE data_sum_index = 68 AND data_sum = "24045771412594250684228176888212";

Average: ~0.0004 sec (UWAGA! Specjalnie w warunku nie użyłem zwróconej warości funkcji, tylko dałem ją na sztywno, ręcznie wpisaną – funkcja by była wykonywana dla każdego porównania rekordu z osobna!).

Nasze zapytanie działa znacznie szybciej (~120 razy dla 100k rekordów) kosztem niewielkiej pamięci – po 1 bajcie do rekordu oraz po 1 bajcie do jego indeksu.

Zapewne istnieją szybkie silniki indeksowania danych, natomiast, gdy jesteśmy skazani np. na InnoDB z założeń technicznych – nie oznacza, że się nie da.

Mam nadzieję, że komuś się przyda.


Kubek programatora PHP.pl

Dziś otwarty został sklep.php.pl, którego mały engine miałem okazję pisać. Póki co można w nim nabyć kubek-termos programatora o szczelnym, plastikowym zamknięciu zapobiegającym rozlewaniu się zawartości:

  • Pojemność 400 ml.
  • Nadaje się do spożywania napojów zimnych i gorących.
  • Utrzymuje temperaturę wiele godzin.
  • Dostosowany dla osób prawo i lewo ręcznych.

Cena z przesyłką wynosi 40zł. Mam nadzieję, że z biegiem czasu asortyment znacznie się powiększy. Warto wspomnieć, że z każdym złożonym zamówieniem zasilasz pulę pieniężną przeznaczoną na nagrody w konkursach o 5 zł.